Snowflake has introduced Workspaces in Snowsight – an integrated, browser-based IDE designed to streamline the way data engineers develop within the Snowflake ecosystem. With Workspaces, users can now develop, test and manage their code all from one interface.
Key Benefit
With the introduction of this feature, Snowflake consolidates the data engineering lifecycle into a single environment, simplifying user governance and limiting the amount of context switching.
Alongside this launch, native dbt Core support inside Workspaces has also been introduced, enabling teams to build, version control and deploy dbt projects directly in Snowsight. This bridges the working environment gap teams face when implementing their dbt models and having to view their data inside Snowflake.
In this blog, we’ll look at the new dbt Workspaces with a focus on how well dbt Core has been integrated.
Introducing Snowflake Workspaces
What are Workspaces
Workspaces bring fully fledged IDE capabilities into the Snowflake ecosystem allowing you to create, edit and manage code while remaining inside your Snowflake environment. With included support for Git, version control is also possible, allowing you to easily initialize new projects, clone existing repositories and commit your changes, all from the comfort of Snowsight.
What do They Look Like?

When you open a Workspace, you’re greeted with a layout that includes six panes:
1. Workspaces
Not to be confused with the new IDE feature itself, this panel displays your project folders and files. You can organize code into multiple workspaces, each functioning as a standalone project. Drag-and-dropping files, folder nesting, and file editing are all supported. You’ll start with a default “My Workspace” but can create as many as you need!
2. Worksheets
All your classic Snowflake worksheets are still here, only now they live inside the Workspace. You can access saved, shared, or newly created worksheets alongside your project code, giving you a flexible place to experiment with and validate queries.
3. Object explorer
This pane offers a hierarchical view of your Snowflake environment, including databases, schemas, tables, views, and other objects. It provides instant visibility into your data structure while you code, reducing the need to toggle between tabs.
4. Editor
The heart of the Workspace. This is where you write and edit code. It comes with inline Copilot assistance, offering helpful completions and suggestions to boost your productivity.
5. Results
Once queries are executed, results are shown in a structured format here. This keeps your code and outputs tightly linked, enabling quick iterations and debugging.
6. Query History
You can easily view your historical queries in this pane, allowing you to maintain an overview of your development activity.
DBT Support Inside Workspaces
With full IDE capabilities built into the new Snowsight Workspaces, you can now develop and manage dbt Core projects directly inside your Snowflake environment without the need for additional tools.
Workspaces even go beyond the standard IDE features, by offering native support for dbt Core in the form of support for three key features:
1. Lineage graphs
Instantly visualize your model dependencies with a fully interactive lineage graph.
2. Built-in dbt commands
The IDE provides support for most common dbt commands such as dbt run or dbt compile, allowing you to remain within your IDE to execute basic dbt operations.
3. Tasks
Easily schedule and orchestrate dbt project runs, including the Snowflake monitoring tools to inspect, manage and tune project runs.
Demo Time
Initializing the Project
Let’s start by creating a database and a schema for integrating Git and materializing our dbt models. You can use the following SQL code inside Snowflake to achieve this:
					CREATE DATABASE tasty_bytes_dbt_db;
CREATE SCHEMA tasty_bytes_dbt_db.integrations;
CREATE SCHEMA tasty_bytes_dbt_db.dev;
CREATE SCHEMA tasty_bytes_dbt_db.prod;
					USE tasty_bytes_dbt_db.integrations;
CREATE OR REPLACE SECRET tasty_bytes_dbt_db.integrations.tb_dbt_git_secret
  TYPE = password
  USERNAME = 'your-gh-username'
  PASSWORD = 'YOUR_PERSONAL_ACCESS_TOKEN';

CREATE OR REPLACE API INTEGRATION tb_dbt_git_api_integration
  API_PROVIDER = git_https_api
  API_ALLOWED_PREFIXES = ('https://github.com/my-github-account')
  -- Comment out the following line if your forked repository is public
  ALLOWED_AUTHENTICATION_SECRETS = (tasty_bytes_dbt_db.integrations.tb_dbt_git_secret)
  ENABLED = TRUE;
Having integrated Git, we now need to make sure dbt is able to access remote URLs to download dependencies when running the dbt deps command. This can be done using the following SQL code:
					-- Create NETWORK RULE for external access integration

CREATE OR REPLACE NETWORK RULE dbt_network_rule
  MODE = EGRESS
  TYPE = HOST_PORT
  -- Minimal URL allowlist that is required for dbt deps
  VALUE_LIST = (
    'hub.getdbt.com',
    'codeload.github.com'
    );

-- Create EXTERNAL ACCESS INTEGRATION for dbt access to external dbt package locations

CREATE OR REPLACE EXTERNAL ACCESS INTEGRATION dbt_ext_access
  ALLOWED_NETWORK_RULES = (dbt_network_rule)
  ENABLED = TRUE;
Let’s start initializing our workspace. You can create a new project inside the editor, as shown in the image below.

In this demo, however, we’ll be forking and cloning the repo mentioned earlier. To do this, you’ll need to fill in the form with the configuration you just made.

After pressing the create button, you’ll be greeted by your very first dbt project inside Snowflake!
Navigating and Interacting with the Workspace
Now that we have cloned the repository into the Workspace, you can now inspect, edit and create files inside the repository. Taking a look at the profiles.yml file, we can see one of the key benefits of this integration:
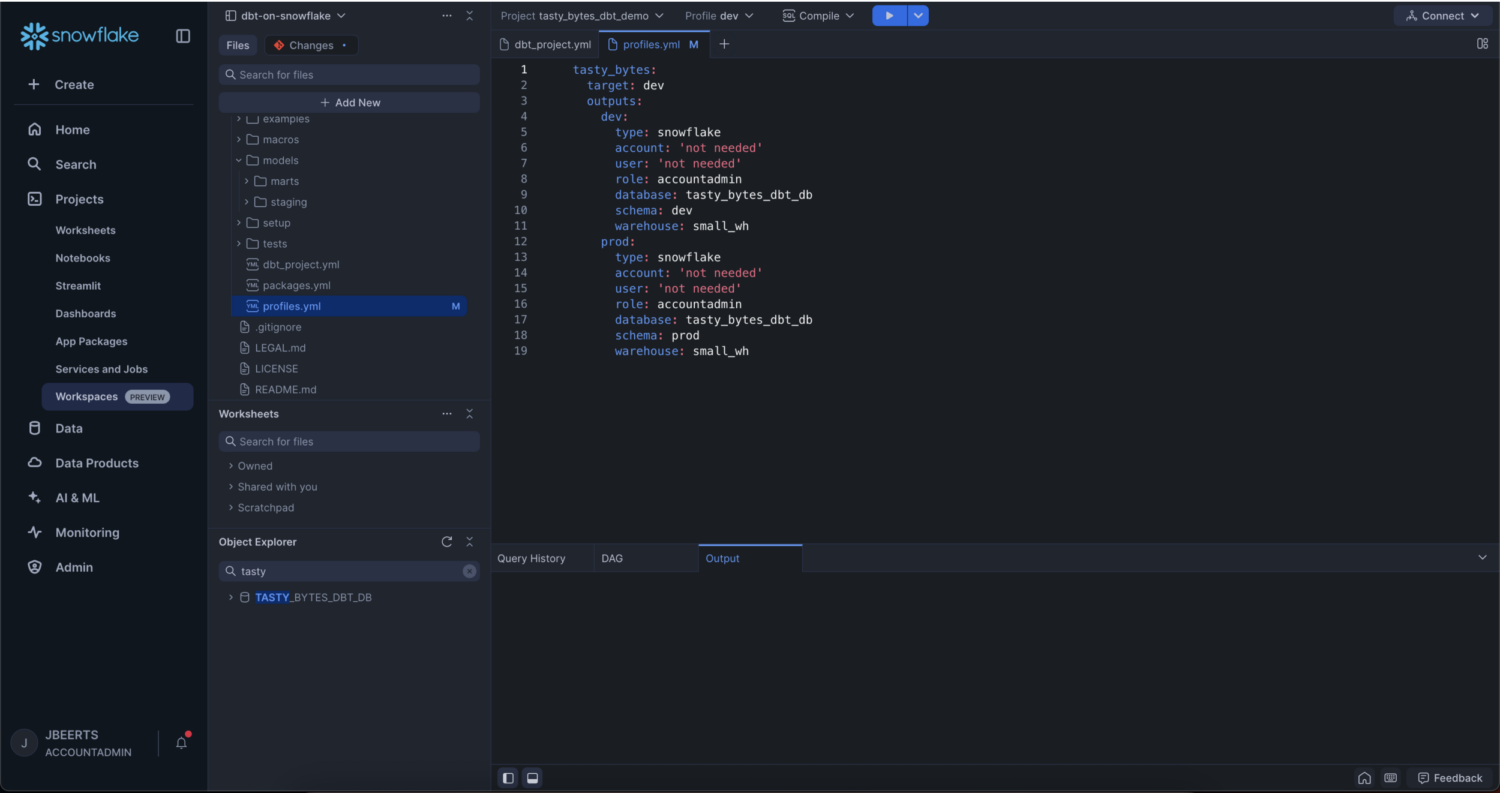
As you can see, the account and user fields are set to ‘not needed’, since dbt is running in Snowflake under the current account and user context, neat!
You can now start running dbt commands as you normally would. These are integrated into the Workspace, providing a convenient way of interacting with the different options. Using this interface, you decide which project to run the command on, what profile to use, and which command to run:

If you ever need to add any parameters to your command such as a filter on which models to run, you can do so as well, using the dropdown menu next to the run button:

As you might know from previously working with dbt, dbt generates a lineage graph describing the path your data follows from its source to its final form. This lineage graph is integrated into the Workspace as well, and will be generated after compiling your project for the first time:

Using the dbt run command, your dbt models will be materialized in their respective tables. You can verify this from the convenience of the same editor, by creating a SQL worksheet using the Worksheets tab and querying the newly formed tables inside your Workspace, or by inspecting the tables using the Object Explorer in the Workspace.
Git Version Control
As mentioned earlier, you can edit code and push those changes back to the Git repository as well. Let’s say we had to update our profiles.yml file to change the Snowflake warehouse our project uses. When reviewing your changes, you’ll get a convenient diff view, highlighting your changes:

Having verified those changes, we now want to commit them to Git. You can do this through the Git menu in the workspaces pane, which lets you specify a commit message and push the changes:

Deploying the Project
When deploying your dbt project from a Workspace, a dbt project object will be created. This object can be used to schedule, run and monitor a dbt project in Snowflake. This allows you to set up tasks that execute a dbt command on a given schedule:

After doing so, you can use the regular Snowflake monitoring tools to get an overview of this job’s state, its run-time costs and much more!
Wait, isn’t this dbt Studio for ‘free’?
Well yes, but actually no. Most features of dbt Studio are present, but some of these aren’t fully implemented yet. Here’s a quick comparison:
| Feature | Snowsight Workspaces + dbt | dbt Studio | Score |
|---|---|---|---|
| Cost | Included in your Snowflake subscription | Paid | Good |
| Syntax highlighting | Classic Snowsight syntax highlighting, including docs link | Regular SQL syntax highlighting | Good |
| Auto-completion | Included, even dbt macros and dbt models | Included | Good |
| Dbt commands (dbt run etc.) |
Included | Included | Good |
| AI support | Not yet included | Included in enterprise-tier plans | Bad |
| Project documentation (dbt docs) | Not yet included | Included | Bad |
| Code linting | Not yet included | Included | Bad |
As you can see, most features provided by the paid dbt Studio are also present in Snowsight Workspaces combined with dbt Core. And all of this for the additional cost of 0$! If any of the features that aren’t supported yet are important to you as a developer, keep in mind that the current version is just a preview. Upcoming features such as inline Copilot, Streamlit support, Python and notebooks are already in the works.
There is of course one big elephant in the room in this comparison: dbt Studio will work with any of the supported data platforms like Databricks and BigQuery whereas Snowsight Workspaces combined with dbt expects the usage of Snowflake as a data platform.
Conclusion
Workspaces bring a powerful IDE to Snowsight to allow you to work more comfortably as a developer. Dbt projects can now be managed inside Snowsight, reducing overhead caused by switching between different windows and contexts to develop your project and manage your data. The seamless integration of Git tooling allows you to collaborate with others without leaving your IDE and resolve conflicts should they occur. Finally, using the deployment options, we can conveniently schedule dbt commands on one of our Snowflake warehouses and leverage Snowflakes monitoring features to keey an eye on things.
With this new feature, Snowflake becomes even more attractive to be used as a data platform in conjunction with dbt and we look forward to seeing more of these productivity enhancing features!
Sources
Snowflake. (n.d.). Workspaces. Snowflake Documentation. https://docs.snowflake.com/en/user-guide/ui-snowsight/workspaces
Snowflake. (n.d.). dbt Projects on Snowflake. Snowflake Documentation. https://docs.snowflake.com/en/user-guide/data-engineering/dbt-projects-on-snowflake
dbt. (2025, July 11). About the Studio IDE. Dbt Labs. https://docs.getdbt.com/docs/cloud/dbt-cloud-ide/develop-in-the-cloud